
As a business owner or marketing manager, I’m sure you know that incorporating images into your content and sales copy adds value to the piece you’re writing.
Having all text with no images to break up the text makes any blog post, content piece, or even a long email more difficult to read. And more boring!
Adding images (and videos!) to your organization’s copy and content are helpful in many ways:
- They make your post more visually appealing.
- They can add context to your subject.
- They show examples of what you’re writing about.
- Images and infographics can explain complex ideas and keep your text less wordy.
In short, it’s better to show and tell with images – rather than just tell!
Finding Images
Nowadays, finding quality images for your content piece is easier than ever. Not long ago, you had to pay for using stock images on websites like iStock. But now, there are other ways to find royalty-free images at no cost.
Three of the best websites for finding free images to capture are Unsplash, Pexels, and Pixabay. You can search for a specific topic for all of these stock image websites. Examples could be images of “business meetings”, “proposals”, or “satisfied clients”. My favorite of the three companies is Pexels. They have the most selection of free images, and the best search function, in my opinion.
Another great way to find images is through search engines like Google. Just enter the type of image you’re looking for in the search bar, and when the SERP comes up, hit the Images tab. You should receive lots of image choices there! Unfortunately, you may have to pick and choose a bit, as not all these images are free and downloadable.
If you’re creative and know a bit about graphic design, you can create your own images, graphics, or illustrations. Canva is a nice graphics program to use for this purpose. It’s fairly intuitive to use, and its cost won’t break the bank!
Here are two more tips about using images:
1. Proper Attribution: Be sure to list the source of your images (if required) and follow any usage limitations if the material used is copyrighted.
2. Image Optimization: It’s a good idea to compress and optimize the size of your images before uploading them. This improves website downloading performance and overall user experience.
Capturing Images
Once you find an image you wish to use, you can usually download it to your computer and copy and paste it into your article. But using a specific tool for this saves a couple of steps, plus you can capture just part of the image that’s most important for you. And these tools make your images infinitely customizable!
You can use a handful of tools to grab online images for your client’s content. They all have similar functions and features.
Here’s a brief description of three of the most popular image and video-capturing tools:
1. LightShot describes itself as “the fastest way to take a customizable screenshot”. It has:
- an intuitive interface
- powerful edit functions
- the ability to create shareable links to the image
- a similar image search function
- and instructions in 15 different languages!
2. Nimbus Platform is great for capturing screenshots of images and videos. This software emphasizes collaboration with teams. With Nimbus, you can:
- show and explain your screen using an embedded video (similar to Loom)
- attach content like files, text, and tables
- make comments and add tasks
- and have your screenshot edited by your teammates
3. Snagit offers “powerful screen capture for clear communication”. With Snagit, you can:
- Capture your screen
- Add additional context by marking up your screenshots or using a template to create visual instructions or guides
- Share it as an image, video, or GIF with your team
An Image-Capturing Example
Since I use Snagit extensively to capture images for my clients’ content pieces, I’ll show you how it works for simple images:
First, find a photo you’d like to use. I went to the Pexels website and typed in the subject “businesspeople shaking hands”:

The image in the middle is the one we’ll use.
Here’s Snagit’s “capture” dashboard:
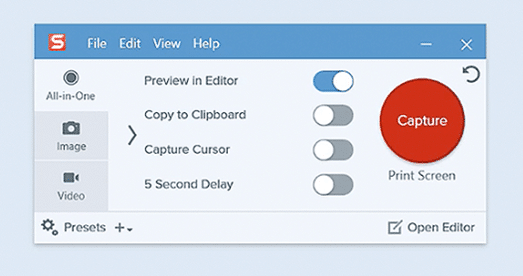
You can use the All-in-One or the Image buttons to grab a single image. When you hit the red Capture button, you can frame the shot you wish to use and click on the camera icon to snag the image.
The image then appears in the Snagit Editor window:
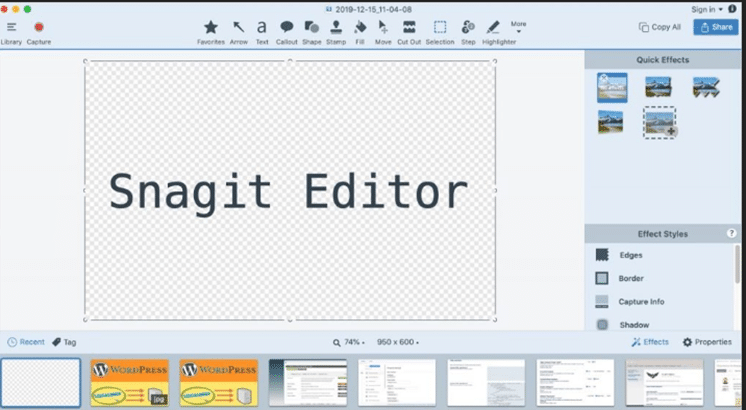
Normally, the image captured would now appear in the pallet area right where it says Snagit Editor. (Unfortunately, Snagit won’t allow either an image of a Snagit capture, or an image of the image captured and displayed in Snagit Editor!).
You can, of course, edit your image here. Then, when the image is just right, you can click the “share” button (upper right) and copy it to your clipboard or a file on your computer.
Then, paste the image where you want it in your B2B content article:

These steps may look complicated at first. But you’ll soon discover that using Snagit can save some steps compared to downloading an image from an image website. And it’s much more versatile, too!
Whether you choose Snagit, LightShot, Nimbus, or another image-capturing tool, you’ll love how easy it is to add images (and pizzazz!) to your company’s writing projects. And your clients will appreciate your work even more!
Get the Words That Will Help Your Business Win


